• TwitterFacebookGoogle PlusLinkedInRSS FeedEmail

Baby Crafts

Free baby craft crochet patterns. Baby Shower Ideas Gifts Scrap-booking, Decoupage, Feng Shui, Origami. Homemade crafts green crafts Halloween baby crafts.

  • Home
  • About Me
  • Contact Me

Spread Happiness With Eeyore Re-DUX

Well I'd like to start off by telling all of Eeyores adoring fans sorry for the wait. He is now back and here to stay. If your new to baby crafts and are just tuning in to my whimsical ramblings. Welcome you've come at a very serendipitous time!

Spread Happiness With Pooh Bear

So here I am again with a late post. But I come bearing a gift so all is not lost. Check it out I got a cool craft of one of my favorite characters from the Hundred Acre Wood Pooh bear!

Recycled Phone Book Pencil Holder

Now there some creativity. The funny this is I have actually folded a book to look like that. When I was bored, but I never would have thought to make a pencil holder out of it.

A Craft For Mothers Day | Mothers Day Special

This particular craft takes about two-four days maybe quicker depends on how heavy the object you use to flatten your flowers. Once that's done it's a cake walk actually you don't have to wait for the flowers you could start on other steps while they are getting properly pressed.

How To Easter Craft | Paper Easter Basket

How-To: Weave a Paper Easter Basket. This craft was not produced by me but the lovely Diane Gilleland. she wrote the book on the suff literally. Diane Gilleland produces CraftyPod, a blog and bi-weekly podcast about making stuff.

Showing posts with label tutorial. Show all posts

Friday, February 18, 2011

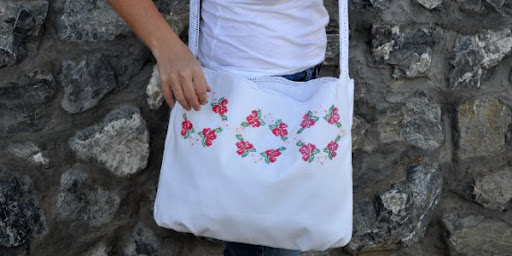
Embroidered Pillow Case = A Cute Bag?

1:26 AM  article, Embroidered, guide, Homemade, information, inspiration, interesting, sewing, stitching, tutorial  No comments

 
So um yeah...This tutorial will teach you how to turn a Pillow case into a stylish bag. For you or your younger daughter. I have done this and it turns out to be quite good so good you could sell them. So with that being said lets dive right in and get started shall we.

Read More
Read more »

Sunday, February 6, 2011

Valentine Flower Crafts for Kids

1:56 AM  card, craft, guide, information, interesting, tutorial, Valentine  No comments

Bouquet of Flowers Card

Valentine Bouquet Card

 Hello my readers! Been a little busy lately but I have a new craft for you guys to try out.
      That's the good news. The bad news is I'm gonna have to take away the Eeyore download link :( sorry

You will need:
  • Thin card and paper in assorted colours - eg white, red and green
  • Paper punch - daisy - approximately 2.5cm diameter
  • Paper punch - very small flower - approximately 0.75cm diameter (optional)
  • Small foam or paper heart shape
  • Mini 3-D double-sided adhesive foam pads
  • PVA glue, glue stick or double-sided adhesive tape
  • Pencil, ruler, scissors and felt-tip pens or coloured pencils
  • Envelope

Read More
Read more »

Wednesday, January 26, 2011

So You Wanna Crochet?

5:46 PM  craft, crochet, guide, information, interesting, to do, tutorial  No comments

Time for steps 3-5. Lets begin shall we.

Crochet: 
Tools of the Trade Crochet

Left to Right: Clover Takumi Set, Boye Aluminum Set, Crystal Palace (bamboo),
Boye Size P (grey), Boye Size Q (blue)


Of course you need more than whats in the image above. You'll need tapestry needles, some clover lock stitch markers small and jumbo, a stitch counter(for more advanced patterns) and of course a clover yarn cutter.

Read More
Read more »

Thursday, June 4, 2009

Designing sandals

7:20 PM  craft, Homemade, idea, information, tutorial, video  No comments

Follow Up To: So They Don't Drive You Insane

This instructional video shows you how to make sandals out of old jeans. The finished product doesn't look to bad either check it out.


Read More

Monday, June 1, 2009

Neck Tie Fathers Day Card

10:24 PM  craft, Homemade, idea, information, interesting, to do, tutorial  1 comment

Here's something cool you and your kid can make for daddy this fathers day. Bare with me as I am using my Sloppy Diagrams again in this tutorial.

Materials
  • 1 Piece of 4 x 4 two sided paper (for tie)
  • 1 Piece of 4 1/2 x 3 1/2 if that's to small try 5 1/2 x 4 1/2 for shirt
  • Pair of Scissors


Step #1: Start by folding your 4 x 4 two sided piece of paper into a triangle.


Step #2: Open the triangle back up and use the center fold as a guide so you can fold each corner into the center.

Step 3#: You should now have sort of a cone shaped piece of paper then flip it over to it front side.


Step 4#: Now that you have flipped onto its front side the side with the colors showing. Lets make the front knot of the neck tie. Fold the top down about 3/4 of the way.


Step #5: Then take the point and fold it back up not to the top but about halfway.


Step 6#: Now you see where the tip ended up after the fold you that as a guide and fold the paper up.


Step #7: After that all you have to do is. Flip it over again and repeat step #2 and you should have your necktie.
________________________________________
Next Make A Simple Shirt For Your Neck Tie
________________________________________

No Sloppy Diagrams for this it's just tooo easy.

Step #1: Grab your 5 1/2 x 4 1/2 two sided paper. Fold it an inch of the way down.

Step #2: Now open it up make a cut on each side leaving about 1 1/2 in.

Step #3: Then fold each side into the middle.


The image above is what a finished product should look like with a little more work. Have fun making one of these.

Read More

Rapid Fire Marshmallow Shooter

4:20 PM  craft, guide, Homemade, idea, information, to do, tutorial, video  No comments

What's better than a Marshmallow Shooter? A Rapid Fire Marshmallow Shooter! Check out the video.

Read More

Marshmallow Shooter

3:12 PM  craft, guide, Homemade, idea, information, to do, tutorial  No comments

Ever just get the urge to shoot marshmallow's at things. You may not have but your kid probably has. I present to you the idea a marshmallow shooter. The best thing is I'm gonna tell you exactly how to make one. Followed by a video that's gonna show you how to make a better one. Let's get started shall we.

Materials
  • A 10ft 1/2 inch PVC Pipe
  • A Saw doesn't really matter what kind
  • Measuring Tape
  • Two 90 Degree Elbows(smooth)
  • Two T's
  • Two Caps
  • A Marker(to mark off measurements)
  • Sandpaper

Making The Marshmallow Shooter
_____________________________
Step #1: Make four 3in pieces so take you measuring tape out hook it at the beginning of you 10ft PVC and make a mark at every 3in, 3|6|9|12|.

Step #2: Now it's time for you to cut and sand down the burs around the edge and the inside of your pipes.

Step #3: On to the measuring and cutting two 5in pieces take you measuring tape out hook it at the beginning of you 10ft PVC and make a mark at every 5in, 5|10|. After you've done that, Just repeat step #2.

Step #4: Make one 7in cut and repeat step #2.

Step #5: Layout all you materials you should have four 3in two 5in and last but not least one 7in.

Step #6: Now it's time for the two 90 degree elbows, the two T's and two caps. Your gonna use them to connect all the pieces, like in the sloppy diagram below. It's the best I could lol.

And that's the tutorial hope it helped. Have fun shooting marshmallow's.

Read More

Sunday, May 31, 2009

Kirigami??? What's that

11:51 PM  craft, guide, idea, interesting, tutorial, video  2 comments

Kirigami is kinda like origami but with a Craft Knife. The video below will help you to better understand.


-

Read More

Moon Bottle Cover

4:26 PM  crochet, guide, Homemade, idea, information, interesting, pattern, tutorial  No comments

Another pattern for your viewing pleasure. This time it's a cute bottle cover.


Moon Bottle Cover

Materials
______________
Size of cover 22 x 39cm (8 1/2 x 15 1/2 in)

Rowan RYC Cashsoft DK and Cashsoft Baby DK

A DK Grey (518) 2 x 50g/ 1 3/4 oz

B DK Lime green (509) 1 x 50g/ 1 3/4 oz

C Baby DK Pale green (804) 1 x 50g/ 1 3/4 oz

D DK Organge (510) 1 x 50g/ 1 3/4 oz

Needles
1 pair each of 31/4 mm (US 3) and 4mm (US 6) needles

Buttons
3

Tension
_____________
22 sts and 30 rows = 10cm (4in) square measured over
stocking stitch using 4mm (US 6) needles.

Getting Started

Lower Back
_______________
Using 4mm (US 6) needles and yarn A, cast on 27 sts.
Beg with a K row, work in st st as follows: Work 1 row. Cast on 6 sts at beg of next next 2 rows, 39 sts.
Inc 1 st at each end of next 4 rows, then on foll alt row, ending with WS facing for next row, 49 sts. **
Work 43 rows, ending with RS facing for next row.
Change to 3 1/4mm (US 3) needles.
Next row (RS) K1, *P1, K1, rep from * to end.
Next row P1, *K1, P1, rep from * to end.
These 2 rows form rib.
Work in rib for a further 4 rows, ending with RS facing for next row.
Next row (RS) Rid 9, (cast off 3 sts, rib until there are 11 sts on
right needle after cast off) twice, cast off 3 sts, rib to end.
Next row Rib to end, casting on 3 sts over thos cast off on previous row.
Work in rid for a further 6 rows, ending with RS facing for next row. Cast off in rib.

Front
____________
Work as given for lower back to **.
work 9 rows, ending with RS facing for next row.
Using the intarsia technique, work next 54 rows.
Which is worked entirely in st st beg with row 11 (a K row)
and end at row 64. Break off contrasts and cont using yarn A only.
Work 2 rows.

Shape Top
______________
Dec 1 st at each end of next 4 rows. 41 sts
Cast off 3 sts at beg of next 2 rows, 35 sts.
Dec 1 st at each end of next 3 rows, then on fall alt row, 27 sts.
Work 1 row, ending with RS facing for next row.
Change to 3 1/4mm (US 3) needles.
Beg with a Krow, work in st st as follows: Work 2 rows
Inc 1 st at each end of next 4 rows, ending with RS facing for next row, 35 sts.
Cast on 3 sts at beg of next 2 rows, 41 sts.
Inc 1 st at each end of next 4 rows, 49 sts.
Work 8 rows, ending with RS facing for next row.
Change to 31/4mm (US 3) needles.
Work in rib as given for lower back for 14 rows, ending with RS facing for next row.
Cast off in rib.

Making Up
Press pieces carefully on WS, using a warm iron over a damp cloth.

Embroidery
______________
Using yarn D make a 5cm (2in) long tassel and attach to top of hat section of motif as in photograph. Using the picture above as a guide. Use yarns C and D, embroider stars in sky. For each small star, work three straight stitches and secure at centre with a cross stitch. Using yarn C, work french knots at ends of these straight stitches.

Overlap last 14 rows of front over last 14 rows of back and sew along side edges. Fold in half across centre of narrow robbed section, matching cast-on edges and sew front to back along all edges. Sew on buttons.

Read More

Cute Bunny Rabbit

2:56 PM  baby, craft, crochet, Homemade, idea, information, inspiration, interesting, pattern, tutorial  No comments


Back again presenting another baby craft

Cute Bunny Rabbit
------------------

Measurements
Approximately 28cm, excluding ears

Materials
  • Two 50g balls of Debbie Bliss cashmerino aran in Duck Egg
  • Small amount of cream yarn for pom-pom tail
  • Pair of 3 1/4 knitting needles
  • Washable polyester toy stuffing
  • Grey embroidery wool for features
--------------

Tension

23 sts and 32 rows to 10cm square over st st using
3 1/4mm needles

Abbreviations
______________
m1L= inserting left needle from front, lift stand
between sts and k into back of it so base of made st
slants to the left

m1R= inserting left needle from the back, lift stand
between sts and k into front of it so base of made st
slants to the right

Face
_______________
With 3 1/4mm needles cast on 9 sts.
1st row: (right side) Kfb, k6, kfb, kl.
2nd row: and every wrong side row P.
3rd row: Kfb, k4, m1R, k1, m1L, k3, kfb, k1, 15 sts.
5th row: Kfb, k6, m1R, k1, m1L, k5, kfb, k1, 19 sts.
7th row: Kfb, k8, m1R, k1, m1L, k7, kfb, k1, 23 sts.
9th row: Kfb, k9, m1R, k3, m1L, k8, kfb, k1, 27 sts.
11th row: Kfb, k10, m1R, k5, m1L, k9, kfb, k1, 31 sts.
13th row: K11, k2tog, k5, skpo, k11, 29 sts.
15th row: K10, k2tog, k5, skpo, k10, 27 sts.
17th row: K1, k2tog, k6, k2tog, k5, skpo, k6, skpo, k1, 23 sts.
19th row: K1, k2tog, k4, k2tog, k5, skpo, k2, skpo, k1, 19 sts.
21st row: K1, k2tog, k2, k2tog, k5, skpo, k2, skpo, k1, 15 sts.
21st row: K1, [k2tog] twice, k5, [skpo] twice, k1, 11 sts.
P 1 row.
Cast off.

Back
Gusset
With 3 1/4mm needles, cast on 22 sts. Beg with a k row, work 6 rows in st st. Cont in st st, dec one st at each end of next 8 rows, 6 sts. Cast off.

Back
With right side facing. pick up and k42 sts around shaped edge of gusset. Beg with a p row, work 15 rows in st st.

Dec row(right side)
K1, [k2tog] 10 times, [skpo] 10 times k1, 22 sts. Beg with a p row, work 11 rows in st st

Shape Armholes
Cast off 2 sts at beg of next 2 rows, 18 sts.

Dec row (right side)
K1, k2tog, k to last 3 sts, skpo, k1, 16 sts. Work 5 rows in st st.

Shape Shoulders
Cast off 3 sts at beg of next 2 rows, 10 sts. Work 2 rows in st st.

Shape Back of head

Inc row (right side) Kfb, k to last, 2 sts, kfb, k1, 12 sts, Cont in st st, inc in this way at each end of next 3 right side rows, 18 sts. Work 5 rows in st st. Dec one st at each en of the next row and 4 foll right side rows, 18 sts. cast off.

Front
With 3 1/4mm needles, cast on 22 sts. Beg with a k row, work 16 rows, st st. Dec on st at each end of next row, 20 sts. Work 11 rows in st st.

Shape Armholes
Cast off 2 sts at beg of next 2 rows, 16 sts.

Dec row (right side) K1, k2tog, k to last 3 sts, skpo, k1, 14 sts. Work 5 rows in st st.

Shape Shoulders
Cast off 2 sts at beg of next 2 rows, 10 sts.

Dec row (right side) K1, k2tog, k to last 3 sts, skpo, k1, 8 sts. Work 2 rows in st st. Cast off.

Legs
With 3 1/4mm needles, cast on 5 sts. 1st row (right side) [ktb] 4 times, k1 9 sts.
P 1 row. Inc one st at each end of next row and roll 2 right side rows, 15 sts. Work 17 rows in st st.

Shape Thighs
1st row (right side) K6, [kfb] twice, k7, 17 sts. Working one more st before and sfter incs, inc 2 sts in this way at centre of next 5 right side rows, 27 sts. Work 9 rows in st st **.

Next row (right side) K11, skpo, k1, k2rog, k11, 25 sts, P 1 row.
Next row (right side0 K10, skpo, k1, k2rog, k10, 23 sts, P 1 row. Cast off.

Arms
Work as given for Legs to **. Shape top Cast off 2 sts at beg of next 2 rows. 11 sts. Dec one st at each end of next row. 9 sts.
P 1 row.
Cast off.

Ears
With 3 1/4mm needles, cast on 7 sts

1st row (right side) kfb, k to last 2 sts, kfb, k1, 9sts.
2nd row K1, p to last st, k1. Cont in st st with k1 edge sts, inc one st at each end of next 3 right side rows. 15 sts. Work 31 rows straight.

Dec row (right side) K2, skpo, k to last 4 sts, k2tog,
k2. 13 sts.
Dec in this way at each end of next 2 right side rows,
9 sts. Work 1 row. Cast off.

To Finish
______________
Join inside leg seams. Stuff legs. Flatten tops of legs and slip stitch closed. Join back to front at side seams. Sew legs to cast on edge of front, then to cast on edge of back join arm seams. stuff arms. stuff body to armholes. join arm seams. stuff arms. Stuff body to armholes. join shoulder and set in arms. Add more stuffing to body through neck hole. Fold cast on edge of face in half and join for chin seam. Join face to back of the head, leaving a gap at the top. Stuff face. Roll cast off edges of ears and set ears into gap at top of head, closing seam between ears. Add more stuffing to head, Join face to neck. Using Grey embroidery thread and face shaping as a guide to placing features, embroider nose, mouth and eyes, pulling thread through head to indent eyes slightly. Make a pom-pom from cream yarn and sew on for tail.

Well finally finished with this one, its a really nice finished product. If it's to plain you can always just rework the pattern to suit your own sense of style. Oh yeah I have a nice matching hooded sweater pattern for this that I will be posting soon. So look out for that in the mean time have fun making this

Read More

Note [Knitting Abbreviations]

12:11 PM  crochet, information, note, tutorial  No comments

If you don't already know em I suggest you learn them. This list is incomplete but is relevant for the tutorials that I post. For a full list go to KnittingHelp(dot)com. Another tutorial is in the works so look out for it ;).


Notes: Knitting Abbreviations
**.........Repeat
alt........alternate
beg......beginning
cont.....continue
dec......decrease
foll.......following
inc.......increase
k...........knit
kfb........knit into front and back of next st
m1........make one by picking up the loop lying between st just worked and next stand working into back of it.
patt.....pattern
p..........purl
pfb......purl into front and back of next st
psso.....pass slipped st over
rem......remaining
rep........repeat
skpo.....slip 1, knit 1, pass slipped stitch over
sl............slip
st(s)......stitch(es)
st st.........stocking stitch
tbl...........through back loop
tog......together
yf.......yarn forward
yon......yarn over needle
yrn......yarn round needle

Read More

Embroidered Raglan Sweater [Baby Craft]

1:30 AM  baby, craft, crochet, guide, idea, information, inspiration, pattern, tutorial  No comments

Size 1 (3-6 months)
To Fit Chest: 46cm||Width: 55cm||Length: 24.5cm||Sleeve: 16cm
Size 2 (6-9 months)
To Fit Chest: 52cm||Width: 58cm||Length: 28.5cm||Sleeve: 31cm
Size 3 (9-12 months)
To Fit Chest: 52cm||Width: 61cm||Length: 31.5cm||Sleeve: 21cm


Tension

18 stitches and 25 rows to 10cm square measured over stocking
stitch on 4mm needles. Always work a tension swatch and change needles accordingly if
necessary.

Materials
Any medium-weight or dk yarn, such as
Rowan Hand knit DK Cotton

A (red) 5(5:5) x 50g balls

B (pink) 1(1:1) x 50g balls
Oddments of yarn for embroidery1 pair each of 3.75mm and 4mm knitting needles. Large sewing needle 3 small buttons, different colors and designs.

Tech Tips
The only special techniques required are increasing and decreasing and knitting through the
back of the loops for the full fashioning detail. When knitting fully-fashioned garment,
work the increases and decreases 3 stitches in from the outside edge.

Knitting the back and front
With 3.75mm needles and yarn B, cast on 53 (57:63) stitches. Change to 4mm needles and yarn A and continue in stocking stitch - one row knit, one row purl alternately - until work measures 13 (15: 17)cm from cast-on edge, ending with a wrong side row.

Shape raglan
Cast off 2 stitches at beginning of next 2 rows. Decrease 1 stitch at each end of next and every alternate row until 19 (21:23) stitches remain. Cast off.
Knitting the sleeves
With 3.75mm needles and yarn B, cast on 33 (35:37) stitches. Change to 4mm needles and yarn A and continue in stocking stitch, increasing 1 stitch at each end of 5th and every following 6th (8th:6th) row until 45 (47:53) stitches remain. Continue without shaping until work measures 16(19:21)cm from cast edge.

Shape raglan
Cast off 2 stitches at beginning of next 2 rows. decrease 1 stitch at each end of next and every alternate row until 11 (11:13) stitches remain. Cast off.

Making up sweater
Sew any yarn ends. Lay out all finished pieces. Press gently with a steam iron, taking care not to flatten the rib. Join both sleeves to back raglan seams and left sleeve to front raglan seam.

Knitting button band
With 3.75mm needles and yarn A, and with right side facing, pick up and knit 32(34:38) stitches up right sleeve raglan, 10(10:12) stitches across sleeve top, 19 (21:23) stitches across front, and 32 (34:38) stitches down front raglan, 122(130:146) stitches.

Make button holes
Knit 8 (8:9) stitches, * with yarn forward knit 2 together, knit 8(9:10), repeat from * with yarn forward knit 2 together, knit to end. Change to yarn B and knit 1 row.


Note
  • Pattern #1: Is Stem Stitch
  • Pattern #2: Is Satin Stitch
  • Pattern #3: Is Running Stitch
  • Pattern #4: Is French Knot
Embroidering the sweater
Using oddments of yarn, embroider simple running stitch around each edge of the sweater, up the sides and around the cuffs. Using the embroidery template as a guide, copy the flower motif using simple stem stitch, running stitch, satin stitch and french knots. Alternatively work a design of your own to personalize you garment.

Finishing the sweater
Sew buttons onto shoulder bands to align with button holders. Join side and sleeve seams.

That was a monster lol. I'm gonna need to recover after this one. Have fun making it, Lord knows I had fun writting it (not really) lol.

Read More

Saturday, May 30, 2009

Decoupage: I Got The Materials Now What!?

2:31 PM  baby, craft, decoupage, guide, idea, tutorial  No comments

|Prelude|: As with all art you will need to have an idea.

Step 1|First Things First:
Prepare your surface you should start by making sure it's clean. Then paint and seal it.

Step 2|What Comes Next?: Cut out your pictures using your Craft knife, or School Scissors for your kid.

Step 3|Uhuh Now What?: Now you will want to arrange the pictures in an order that you like. Just for reference from my own experience. The first arrangement is always subject to change. Nothing is really set in stone until you add the glue. Then it's still not set in stone it's set in glue so..... anyway. The images you like can go any which way you want. On to the next step.

Step 4|Arrangement Got It What Else?: Alright now you add the glue to the backs of your pictures be careful though you don't want the ink running. Especially if your using pics from a magazine. I won't really go into the steps to prevent ink bleeding right now. Just don't add to much glue. Make sure you add a bit to the surface your adding the images to also.

Step 5|Anything Else?: Now it's time to stick your picture to your surface. Use a Brayer or your handy dandy Popsicle stick. Oh yeah if it's a larger picture start from the center and work you way out.

Step 6|Alright it's Starting to Look Good: Continue step #4 and #5. Until you have no more images you want to add, or you run out whichever comes first. Then it's to the coating process. Try This: dilute your Elmer’s or other PVA glue. With a little bit of water so it goes on smoothly. The color blue seems to run more than others so watch for that. Make sure to let it dry a completely.

Step 7|Ok I'm Done Right?: Wrong. You'll have to keep adding coats of glue or another sealer (polyurethane, acrylic spray, etc. ) . Keep adding coats until the edges of the pictures are smooth.

OK guide's over have fun!

Read More

How To Crochet

1:15 AM  craft, crochet, guide, information, tutorial  No comments


I found this extensive guide on how to crochet. This guide is nothing short of amazing and should be useful for anyone who wants to learn how to crochet. It can be difficult starting out with no one to guide you through, but if you don't know anyone in your life that crochets, or that can teach you how then this guide is on of many that are very helpful.

Here is the link How To Crochet. Oh yeah you can also just click the picture above.

Read More

Recycled Phone Book Pencil Holder

12:49 AM  craft, guide, Homemade, idea, information, tutorial  No comments


Now there some creativity. The funny this is I have actually folded a book to look like that. When I was bored, but I never would have thought to make a pencil holder out of it. That's just one of the things you can do with a book you dislike or may have wasted your money on.

Here's the link to the Recycled Phone Book Pencil Holder Tutorial.

Read More

Friday, May 29, 2009

Rowan Wool Cotton

11:23 PM  crochet, download, guide, idea, information, magazine, pattern, pdf, tutorial  No comments

This Download Has Been Removed Cause I Don't Want To get Sued

I found this lovely magazine just searching for new ideas and things to crochet. I thought I should share since It's a very good magazine. It looks dated but the patterns are very stylish, and the instructions are easy to follow. So If you know Rowan then you should know that this is quality stuff, and if you don't know Rowan I suggest you check out their site Knit Rowan.
You can also click the image to take directly to thier site.

The download IS another Pdf. So if you haven't got a pdf reader by now. I suggest you get one cause the majority of the patterns, guides and stuff. That is going to be posted here on Baby Crafts are going to be in that file format. Just go to Google and type in Pdf reader and it will come up with a bunch of results. Almost all pdf readers are free so pick one.


The download is 8.06 megabytes so it's way smaller than the last one. So even those with slow internet connection should be able to get it in an timely manner, and enjoy reading it so um... here it is .

Read More

Baby Crafts Eeyore Crochet[Download Removed]

12:19 PM  baby, craft, crochet, download, guide, Homemade, idea, information, interesting, pdf, tutorial  1 comment

This Download Has Been Removed Cause I Don't Want To get Sued

Here's another project this time it's an Eeyore doll you know from "Winnie The Pooh". Even if you don't know, it's still very cute and stylish. So check it out, make it and give it to someone you love for a gift or just a random present.

Hint: Makes a great gift for toddlers or daughters of all ages.

It's a PDF file so your gonna have to download it. To view the information simply get a program like Foxit Reader it's free and it's great.

Let me warn you it's a very detailed tutorial and it's 45.32 mb. I would've just typed it myself but who really want's to type 45mb worth of pdf not me. I have a fairly fast internet connection and most people should have at least broadband or dsl by now. If you are in the category who doesn't just comment, and I'll try to figure out a why to get the tutorial to you in a faster more quicker manner.

Without further or do here is the Eeyore Crochet .

Read More

Cute Baby Bib

1:52 AM  baby, craft, crochet, guide, Homemade, idea, information, tutorial  No comments


Make your little guy’s feedings a little more formal with this super sweet bib with a necktie applique. Get a load of the little collar! Charity from Just Tutes! is going to show you just how to make one. Go to the tutorial.

Read More
Older Posts Home

Connects

Blog Directory


Feedage Grade b rated


  • Popular
  • Tags
  • Blog Archives
  • Spread Happiness With Eeyore Re-DUX
    Well I'd like to start off  by telling all of Eeyores adoring fans sorry for the wait. He is now back and here to stay. He has even brou...
  • Spread Happiness With Eeyore
      CHECK OUT THE RE-DUX EEYORE IS BACK AND HERE TO STAY Very busy day yesterday sorry I didn't get to post a pattern that. I prom...
  • Spread Happiness With Pooh Bear
    So here I am again with a late post. But I come bearing a gift so all is not lost. Check it out I got a cool craft of one of my favorite ch...
  • How To Easter Craft | Paper Easter Basket
    How-To: Weave a Paper Easter Basket   This craft was not produced by me but the lovely Diane Gilleland. she wrote the book on the suff ...
  • Eeyore and Friends Update
    Hi everyone I have some tremendous news! I have found the Eeyore crochet pattern, not only have I found the Eeyore but his friends Tigger, P...
Powered By Blogger

Pintrest Follow ME

Follow Me on Pinterest
© Baby Crafts. Powered by Blogger.

My Fav's

  • A Little of This and a Little of That

Labels

  • article
  • baby
  • baking
  • best sausage breakfast casserole
  • card
  • clothing
  • cooking
  • craft
  • crochet
  • decoupage
  • doll
  • download
  • easy sausage breakfast casserole
  • Embroidered
  • feng shui
  • Floam
  • guide
  • hat
  • Homemade
  • how to make stickers at home
  • idea
  • information
  • inspiration
  • interesting
  • jimmy dean sausage breakfast casserole
  • life
  • magazine
  • make vinyl stickers at home
  • make your own vinyl stickers
  • make your own vinyl stickers at home
  • note
  • origami
  • paper to make stickers
  • pattern
  • pdf
  • printer paper to make stickers
  • recycle
  • safety
  • sausage breakfast casserole recipes
  • sausage breakfast casserole with crescent rolls
  • sewing
  • stitching
  • to do
  • tutorial
  • Valentine
  • video
  • wax
  • weeding
  • zen garden

Blog Archive

  • ▼  2016 (3)
    • ▼  May (2)
      • Grandmas Gold Egg And Sausage Breakfast Casserole
      • Wedding Season - Print Our Own Marriage Invitation...
    • ►  March (1)
  • ►  2015 (3)
    • ►  July (2)
    • ►  May (1)
  • ►  2012 (5)
    • ►  June (3)
    • ►  May (2)
  • ►  2011 (9)
    • ►  October (1)
    • ►  April (1)
    • ►  February (2)
    • ►  January (5)
  • ►  2010 (1)
    • ►  August (1)
  • ►  2009 (31)
    • ►  June (13)
    • ►  May (18)

Recent Posts

Follow @bgardner

Follow this blog

 
  • Blogger Tutorials | Tools , Tips , SEO, Facebook tricks

    Loading...
  • Blogger Templates Gallery

    Loading...
  • Pages

    • Home
    • YouTube Crafting Videos
    • About Me
    • Contact Me
Copyright © Baby Crafts | Powered by Blogger
Design by FThemes | Blogger Theme by Lasantha - PremiumBloggerTemplates.com | NewBloggerThemes.com Distributed By Gooyaabi Templates