• TwitterFacebookGoogle PlusLinkedInRSS FeedEmail

Baby Crafts

Free baby craft crochet patterns. Baby Shower Ideas Gifts Scrap-booking, Decoupage, Feng Shui, Origami. Homemade crafts green crafts Halloween baby crafts.

  • Home
  • About Me
  • Contact Me

Spread Happiness With Eeyore Re-DUX

Well I'd like to start off by telling all of Eeyores adoring fans sorry for the wait. He is now back and here to stay. If your new to baby crafts and are just tuning in to my whimsical ramblings. Welcome you've come at a very serendipitous time!

Spread Happiness With Pooh Bear

So here I am again with a late post. But I come bearing a gift so all is not lost. Check it out I got a cool craft of one of my favorite characters from the Hundred Acre Wood Pooh bear!

Recycled Phone Book Pencil Holder

Now there some creativity. The funny this is I have actually folded a book to look like that. When I was bored, but I never would have thought to make a pencil holder out of it.

A Craft For Mothers Day | Mothers Day Special

This particular craft takes about two-four days maybe quicker depends on how heavy the object you use to flatten your flowers. Once that's done it's a cake walk actually you don't have to wait for the flowers you could start on other steps while they are getting properly pressed.

How To Easter Craft | Paper Easter Basket

How-To: Weave a Paper Easter Basket. This craft was not produced by me but the lovely Diane Gilleland. she wrote the book on the suff literally. Diane Gilleland produces CraftyPod, a blog and bi-weekly podcast about making stuff.

Showing posts with label article. Show all posts

Friday, February 18, 2011

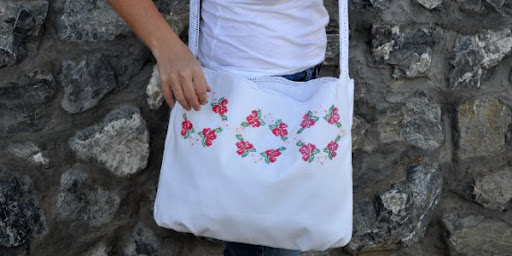
Embroidered Pillow Case = A Cute Bag?

1:26 AM  article, Embroidered, guide, Homemade, information, inspiration, interesting, sewing, stitching, tutorial  No comments

 
So um yeah...This tutorial will teach you how to turn a Pillow case into a stylish bag. For you or your younger daughter. I have done this and it turns out to be quite good so good you could sell them. So with that being said lets dive right in and get started shall we.

Read More
Read more »

Friday, June 5, 2009

Recycle Old Clothes Into Something New

3:24 PM  article, clothing, craft, guide, Homemade, idea, interesting, recycle, to do  No comments


This is a Follow Up To: So They Don't Drive You Insane


In this post I'm going to tell you some ways in which you can recycle your winter clothes into summer clothes. There is one thing you need to know about turning you long sleeve shirts into short sleeve ones. The back of the sleeve is always shorter.


1. Make a sleeveless shirt. Remove the sleeves from a shirt. Turn the edges of the armhole over twice and stitch a narrow hem. Add lace to the neckline or armholes.

2. Make a short sleeve shirt. Cut and hem long sleeves into short sleeves. Try cutting sleeves to three-quarters of the original length. Add a cuff, lace or small ruffle of contrasting color to the hemline of the sleeve.

3. Shorten a shirt. Cut and gather the hemline. Place a buttonhole at the front or side of the hemline for a colorful drawstring. Tie the drawstring into a bow or double knot.

4. Make a vest. Remove the sleeves from a zippered sweatshirt. Finish the edges of the armhole if desired. Recycle the fabric into pockets for the inside or outside of the vest. Try inserting a pouched pocket along the side seams.

5. Make a jacket. Cut and hem a coat. Recycle the fabric into pockets or a belt for a different coat. Gather the hemline or add a cuffed waistband. Change the buttons.

6. Make shorts or capri pants. Cut and hem pants. Try fraying the hemline or rolling it into a cuff. Add a small bow or fabric flower to the outside of the cuff.

7. Make something new. Change a pair of pants into a cute summer skirt. Recycle fabric into a bikini, tube top or halter top.

8. Make loungewear or pajamas. Remove collars, sleeves or pant leg elastics from comfy, soft garments. Leave hemlines unfinished.

Read More

Wednesday, June 3, 2009

So They Don't Drive You Insane

6:32 PM  article, baby, craft, guide, Homemade, idea, information  No comments


The summer break can get very boring for children. They love being out of school, but daytime TV can drive them crazy, not to mention the fact that they got tired of playing with all their new holiday toys about 2 days after the holiday. So how do you keep kids busy during the holiday break? Well you could always give them chores to do....I'm only kidding. One of the best ways to keep kids busy during the holiday break is crafts. Crafts take a lot of time and keep kids interested in what they are doing. Before they know it, it will be time for them to go back to school.

Here are some off the top of my head. That will keep you and the kids busy. Some of them can get a little messy lol.

Description
-------------------------------------------------------------------------------------------------
Clay modeling
+
Acrylic painting| ages 10+|
+ Finger painting

Simple sewing projects (Id say around age 8 with supervision)
+
Designing sandals and hats
+
T-shirt painting for this if you wanna try with younger childen you can. Just dip their hand in some paint and press it on a shirt. Just make sure you clean their hands afterward' s cause you child will to eat it.
+
Make some wind chimes. (very easy to make)
+
Key Charms you know those little things that go key rings.
+
Turn your winter clothes in to summer clothes. A snip here and a snip there with some scissors, and you can add some nice additions to your wardrobe.

There's a whole lot more stuff you can do. Also I'll be explaining how to do some of this stuff in later articles.

Read More

Making Gel Candles for Fun & Profit

4:44 PM  article, craft, guide, idea, information, to do, wax  No comments


Candle making is by no means a dangerous affair and is often an activity that is fun for all the family however people should follow some very basic safety precautions.


Making Gel Candles for Fun & Profit
By: A Graf
____________________________________________________________________
There are a few items you will need to gather before you can start making your gel candles. The most basic are supply containers, gels, pans, wicks, and of course, your kitchen range. Below is a detailed list of the items you will need, and most of these items are available at your local craft and variety stores.

Containers: It's best to use a heat resistant glass, but there are also many types of glass and acrylics.

Materials: Gel Wax, Paraffin when specified in a recipe, candle scent, candle dye, wick, wick clip, and wick base.

Supplies: Craft sticks, knife, spoon, candy thermometer, pliers, small sauce pan, double boiler for paraffin when used, cooking oil spray, non-stick cookie sheet, ice cream scoop, ice pick, Potato peeler for the dye, stove burner, small deep metal pans, and molds.

Wicks & Clips: Use large bleached wicks. Gel candles burn longer than paraffin candles so a large wick is required for the additional burn time. Do not use wire wicks these will leave debris in the gel. Use a metal base clip and crimp it to one end of the wick with pliers or use a small washer.

Dyes & Scents: Candles dyes are great to use because their color is translucent. Crayons can also be used if the proper dyes are not available at your local stores. Candle dyes come in different forms, from wax squares, to liquids and powders. You can mix colors to form additional colors. Scents are fun to add to make the candle fragrant. Scents come in the form of oil based liquids, pellets and wax solids. You add scent before pouring the candle this avoids evaporation.

Additives & Release Agents: If using paraffin, add stearic acid to increase the hardness and raise the melting point. Use spray cooking oil or silicone spray to aid in the release of the molds.

Submerged Objects: In order to submerge objects in your gel candles they must be resistant to burning and melting. Items that work well are buttons, marbles, toys and jewels. Do not use highly flammable items. Some objects will float so you may have to add the items as the gel cools and thickens. This is where the craft sticks or knife comes in handy. You can push items down that float to the top.

Heating Wax: Paraffin should be heated to 130 degrees F to 140 degrees F. The melting point of gel wax is between 160 degrees and 170 degrees F. If you are melting Paraffin you should always use a double boiler. Gel wax can be heated directly on the burner set at a medium to low heat. Tip: Tear gel into small pieces to control the amount of bubbles.

CAUTION: Always be careful when melting wax. It is highly flammable. Make sure your area is well ventilated. Never leave unattended or around young children without supervision.

Clean Up: Use dish soap and hot water to clean utensils, counter tops and tools. Run paraffin under hot water then under soapy water. You can scrape wax off counter tops, or use small amounts of turpentine to aid in removal (be sure to test first).

Once you learn to create your candles create a business plan and decide on what market to target for your product. You could do theme candles such as weddings, birthdays, etc. Possbily decide on making recipe candles, or whatever great ideas you may have.

Then discover where to sell your candles such as craft shows, sell them on ebay, create your own web site, take them to work, set up trade shows, contact local gift shops and talk with others about selling or starting a new business.

Resources for Candle making/Selling: The Ultimate Gel Candle Book

Article Source: EzineArticles.com

Read More

Tuesday, June 2, 2009

Make Your Own Wedding Favors

8:47 PM  article, baking, cooking, idea, information, interesting, weeding  2 comments


I find that sometimes things you make yourself, can be better or even more valuable. To the people you give them to. Than a product you may purchase from a store. The article below shows you how to make one of those things. Have fun making them.


Save Some Money: Make Your Own Wedding Favors
By: Lesley_Anne Graham
____________________________________________________________________
Not only is it a nice touch, but if you have time to make your own simple wedding favors, you can save money that you desperately need for flowers, food, or your honeymoon.


A great wedding favor to make yourself is molded chocolate. With options from lollipops to delicate multicolored shells, dark chocolate to white chocolates you can dye to match your wedding colors, these edible favors are a winner for every age.

To make your own chocolate wedding favors, follow these steps:

Chocolate Wedding Favors

1. Equipment:

Microwave or double boiler to melt chocolates
Plastic bowls and spoons

Candy molds – plastic or coated metal are fine, but nonstick is critical

Small cellophane bags

Small squeeze bottle

Plastic gloves designed for handling food

Candy thermometer

2. Ingredients:
____________________________________________________________________
Molding chocolate like Merckens Chocolate or Wilton Candy Melts. For best results, buy this at a specialty cooking store and ask the store clerk to help you determine how much to purchase.

Lollipop sticks

Luster dust, or pearl dust, to add shimmer to your chocolate

Small paint brush (for the luster dust)

Oil-based flavorings

Decorative ribbons or other decorations to impress in the chocolate

3. Steps:
____________________________________________________________________
Select your molds. Melt the chocolates in a double boiler or microwave (the double boiler is better because of a consistent melt, but you will need to keep an eye on it.) Water goes in the outer pot, the chocolate sits in the inner. Try not to bring the water to a boil, and do not let any water mix with your chocolate. Stir chocolate until it is melted.

In the double boiler method, you can melt about two pounds of chocolate at a time.

When using the microwave method, melt a half-pound at a time. Place in microwave at about 600 watts for 1 minute, then stir. Return to microwave for 15 seconds at a time until completely melted.

If you want to add a flavor, do it now; no more than 20-25 drops per pound should work.

Next, fill a squeeze bottle with chocolate. Squeeze chocolate into each mold crevice carefully to eradicate air bubbles. Tap mold on counter to eliminate remaining air bubbles; pop the stubborn ones with a toothpick. Fill molds to the top, and insert lollipop stick if you wish. Place mold in freezer for about five minutes, or until the chocolate pulls away from the mold. Remove favors from mold and place on a sheet of wax paper to rest; make sure none of them touch the others.


4. Decorating Your Wedding Chocolates:
____________________________________________________________________
Shimmer can be added by coating your chocolates with luster dust. Dip a brush in water or another clear liquid, then in the dust. Brush powder on for a solid-looking shimmer. Put chocolates in cellophane bags and close by tying with a pretty ribbon. These ribbons can be personalized with name and wedding date, and you can even find miniature roses at many home décor stores to slip into the ribbon.

5. Cost:

The more chocolates you make with the same molds, the lower the cost per chocolate goes. In general, you can make about a hundred chocolates for $30. Larger molds and more elaborate decorations can make costs rise to $1 per chocolate.


------------------------------------------

Lesley-Ann Graham runs WeddingTrix.com - a valuable wedding planning resource with articles, tips and advice to help you plan your perfect wedding. The Bride, Groom, Best Man, Bridesmaids and Groomsmen can find it all at.

Read More

Safety First

7:49 PM  article, information, note, safety  No comments


OK people safety is number one. I don't want anybody getting hurt while using craft knives saws or anything else, you may need to craft and/or practice some of the crafts featured in this blog. Here's a article that talks about some of the potential risks you take.

Some artists and craftspeople might assume that all arts materials are safe to work with, based on the simple fact that the materials are readily available. However, some of these materials can pose a hazard if you do not follow all of the safety instructions on the product label.

It is impossible to list all of the potential hazards associated with every arts and crafts material. However, the following examples highlight some things that could be harmful:

* If you draw or paint, you might inhale dust from dry pigments or fumes from the chemical solvents used to clean brushes. Spray paints can produce mists that are harmful when inhaled. Many of these products are also flammable.

* Some photo-processing solutions used in developers, fixers, stop baths and
intensifiers can irritate skin, be poisonous if ingested and may produce dangerous fumes.

* In jewelery-making and enameling, you could inhale dusts or fumes during soldering, pickling, casting or finishing.

* In stained glass work, you could inhale lead fumes when soldering glass pieces together or you could be exposed to lead when handling lead came or leaded solders. You could also inhale hazardous fumes when using acid fluxes during soldering, or do serious damage to your lungs by breathing in powdered glass when using an electric glass grinder.

* In woodworking, you could seriously damage your lungs by inhaling wood dust over and over again. Some of the solvents and adhesives used in stripping, gluing and finishing can also harm your health.

* Some materials that are safe when used on their own can produce hazardous fumes or materials when they are mixed with bleaches, acids, solvents, household cleaners or other substances.

Don't let this article scare you though, just remember Safety first.

Read More

Is There a Close Relationship Between Art and Sport?

3:15 PM  article, information, note  No comments

portrait figures sports La Diaphane

From a very early age we are encouraged to draw and paint. Using self expression to free ourselves through painting and drawing, supplies our developing and inventive minds with one of its main sources of early learning and personal expressive nourishment. I loved art as a youngster and remember, with great fondness, "escaping" the formal structure of school classes during every period of art!

Through participation in sporting activities, I discovered the outlet I needed to express myself and release the artistic side of my personality. As a "Shortstop" or "Outfielder," my position allowed me to play Softball with inventiveness and flair and my young leadership qualities were recognized as I was made team captain.

I used to enjoy and appreciate the individual qualities, widely varying techniques and artistic expression, displayed by all of my friends, in both art and sport. I found that I had an ability to associate most paintings to the artist and realized that, in the main, there was a close relationship between the art work and the artist's personality and character.

To summarize, I feel that there is a close relationship between art and sport and that both activities provide extremely rewarding sources of intuitive and artistic expression.

Read More
Older Posts Home

Connects

Blog Directory


Feedage Grade b rated


  • Popular
  • Tags
  • Blog Archives
  • Spread Happiness With Eeyore Re-DUX
    Well I'd like to start off  by telling all of Eeyores adoring fans sorry for the wait. He is now back and here to stay. He has even brou...
  • Spread Happiness With Eeyore
      CHECK OUT THE RE-DUX EEYORE IS BACK AND HERE TO STAY Very busy day yesterday sorry I didn't get to post a pattern that. I prom...
  • Spread Happiness With Pooh Bear
    So here I am again with a late post. But I come bearing a gift so all is not lost. Check it out I got a cool craft of one of my favorite ch...
  • How To Easter Craft | Paper Easter Basket
    How-To: Weave a Paper Easter Basket   This craft was not produced by me but the lovely Diane Gilleland. she wrote the book on the suff ...
  • Eeyore and Friends Update
    Hi everyone I have some tremendous news! I have found the Eeyore crochet pattern, not only have I found the Eeyore but his friends Tigger, P...
Powered By Blogger

Pintrest Follow ME

Follow Me on Pinterest
© Baby Crafts. Powered by Blogger.

My Fav's

  • A Little of This and a Little of That

Labels

  • article
  • baby
  • baking
  • best sausage breakfast casserole
  • card
  • clothing
  • cooking
  • craft
  • crochet
  • decoupage
  • doll
  • download
  • easy sausage breakfast casserole
  • Embroidered
  • feng shui
  • Floam
  • guide
  • hat
  • Homemade
  • how to make stickers at home
  • idea
  • information
  • inspiration
  • interesting
  • jimmy dean sausage breakfast casserole
  • life
  • magazine
  • make vinyl stickers at home
  • make your own vinyl stickers
  • make your own vinyl stickers at home
  • note
  • origami
  • paper to make stickers
  • pattern
  • pdf
  • printer paper to make stickers
  • recycle
  • safety
  • sausage breakfast casserole recipes
  • sausage breakfast casserole with crescent rolls
  • sewing
  • stitching
  • to do
  • tutorial
  • Valentine
  • video
  • wax
  • weeding
  • zen garden

Blog Archive

  • ▼  2016 (3)
    • ▼  May (2)
      • Grandmas Gold Egg And Sausage Breakfast Casserole
      • Wedding Season - Print Our Own Marriage Invitation...
    • ►  March (1)
  • ►  2015 (3)
    • ►  July (2)
    • ►  May (1)
  • ►  2012 (5)
    • ►  June (3)
    • ►  May (2)
  • ►  2011 (9)
    • ►  October (1)
    • ►  April (1)
    • ►  February (2)
    • ►  January (5)
  • ►  2010 (1)
    • ►  August (1)
  • ►  2009 (31)
    • ►  June (13)
    • ►  May (18)

Recent Posts

Follow @bgardner

Follow this blog

 
  • Blogger Tutorials | Tools , Tips , SEO, Facebook tricks

    Loading...
  • Blogger Templates Gallery

    Loading...
  • Pages

    • Home
    • YouTube Crafting Videos
    • About Me
    • Contact Me
Copyright © Baby Crafts | Powered by Blogger
Design by FThemes | Blogger Theme by Lasantha - PremiumBloggerTemplates.com | NewBloggerThemes.com Distributed By Gooyaabi Templates