• TwitterFacebookGoogle PlusLinkedInRSS FeedEmail

Baby Crafts

Free baby craft crochet patterns. Baby Shower Ideas Gifts Scrap-booking, Decoupage, Feng Shui, Origami. Homemade crafts green crafts Halloween baby crafts.

  • Home
  • About Me
  • Contact Me

Spread Happiness With Eeyore Re-DUX

Well I'd like to start off by telling all of Eeyores adoring fans sorry for the wait. He is now back and here to stay. If your new to baby crafts and are just tuning in to my whimsical ramblings. Welcome you've come at a very serendipitous time!

Spread Happiness With Pooh Bear

So here I am again with a late post. But I come bearing a gift so all is not lost. Check it out I got a cool craft of one of my favorite characters from the Hundred Acre Wood Pooh bear!

Recycled Phone Book Pencil Holder

Now there some creativity. The funny this is I have actually folded a book to look like that. When I was bored, but I never would have thought to make a pencil holder out of it.

A Craft For Mothers Day | Mothers Day Special

This particular craft takes about two-four days maybe quicker depends on how heavy the object you use to flatten your flowers. Once that's done it's a cake walk actually you don't have to wait for the flowers you could start on other steps while they are getting properly pressed.

How To Easter Craft | Paper Easter Basket

How-To: Weave a Paper Easter Basket. This craft was not produced by me but the lovely Diane Gilleland. she wrote the book on the suff literally. Diane Gilleland produces CraftyPod, a blog and bi-weekly podcast about making stuff.

Showing posts with label information. Show all posts

Tuesday, October 18, 2011

What Is A Zen Garden?

12:08 AM  idea, information, zen garden  1 comment

 Hey I'm back again with another update.


The other evening, walking through a shopping center close to home, I went as usual, several stores that I like.

One of them is full of incense, very nice decorations for the house and a cozy, with dim lights, soft music .....


And there in the background in one of the crowded shelves had a sign saying "Zen Garden ".... and there I was looking at the box, instructions, and after thinking about it .... Two seconds! I went out to pay. I brought him home and I love ...


A Zen garden is the way of life, the universe and is designed to provide vitality, peace and serenity.
Rake the soil allowed to leave the mind free of tension, helps concentration and meditation calms the fears and anxieties.


Breathe deeply while raking and make beautiful drawings on the sand.Also becomes a different and original decorative ...


Now for its entirety and use the correct way, according to the instructions enclosed ...

First I tell you, consists of a bowl of golden proportions (which represents the harmony), fine sand, preferably light colored, smooth, rake ad hoc and three stones of different sizes but proportional to the size of the vessel at the ground.


Every part of this garden has a specific purpose to give us what it was intended to ...
The sand neutralizes the bad thoughts, attitudes and negative emotions, creating an atmosphere of tranquility and serenity.
A space perfectly smoothing represents the vastness of the sea. The grooves may symbolize the different walks of life.

The stones represent the obstacles and stumbling blocks with which we face in life.
The stones symbolize the experiences we gain in life, after overcoming these setbacks and inconveniences ...

The rake is what our guiding hand to move around the stage of our lives, without realizing it, embodied in the drawings of the earth, our anxieties and our fears, depositing it in the form of drawings, more or less edgy grooves ...

It can be used instead of stones, quartz. They generate energy and can represent values ​​such as simplicity, humility or modesty.

Candles are also an option for our Zen garden, but they must be rounded to not break the harmony of space. Otherwise it is preferably located outside the garden ...

There is a curious legend that gave rise to the Zen gardens. It says so:

"Legend has it that when the outfielder finished his work, he called the emperor to contemplate his garden." Congratulations. It is the most beautiful garden I've seen and that rock is the most beautiful of all ", said the emperor.
Instantly, the gardener took the stone marked, removed her from the garden and threw into the sea. Then he explained to his master: "Now everything is perfect, and the garden can be seen in harmony. A garden, like life, must be viewed in its entirety. If we focus on the beauty of detail, the rest will seem too ugly ... "


I hope you liked the entry and clear any dark spot on what they call "Zen Garden".

Regards,
Linda.


For all the lazy ones out there.

The same Zen Garden book can be purchased by following this link.


Japanese Gardens: Tranquility, Simplicity, Harmony

Read More

Friday, February 18, 2011

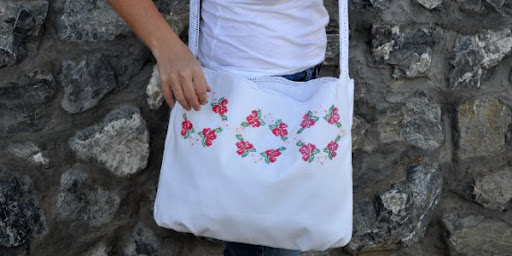
Embroidered Pillow Case = A Cute Bag?

1:26 AM  article, Embroidered, guide, Homemade, information, inspiration, interesting, sewing, stitching, tutorial  No comments

 
So um yeah...This tutorial will teach you how to turn a Pillow case into a stylish bag. For you or your younger daughter. I have done this and it turns out to be quite good so good you could sell them. So with that being said lets dive right in and get started shall we.

Read More
Read more »

Sunday, February 6, 2011

Valentine Flower Crafts for Kids

1:56 AM  card, craft, guide, information, interesting, tutorial, Valentine  No comments

Bouquet of Flowers Card

Valentine Bouquet Card

 Hello my readers! Been a little busy lately but I have a new craft for you guys to try out.
      That's the good news. The bad news is I'm gonna have to take away the Eeyore download link :( sorry

You will need:
  • Thin card and paper in assorted colours - eg white, red and green
  • Paper punch - daisy - approximately 2.5cm diameter
  • Paper punch - very small flower - approximately 0.75cm diameter (optional)
  • Small foam or paper heart shape
  • Mini 3-D double-sided adhesive foam pads
  • PVA glue, glue stick or double-sided adhesive tape
  • Pencil, ruler, scissors and felt-tip pens or coloured pencils
  • Envelope

Read More
Read more »

Wednesday, January 26, 2011

So You Wanna Crochet?

5:46 PM  craft, crochet, guide, information, interesting, to do, tutorial  No comments

Time for steps 3-5. Lets begin shall we.

Crochet: 
Tools of the Trade Crochet

Left to Right: Clover Takumi Set, Boye Aluminum Set, Crystal Palace (bamboo),
Boye Size P (grey), Boye Size Q (blue)


Of course you need more than whats in the image above. You'll need tapestry needles, some clover lock stitch markers small and jumbo, a stitch counter(for more advanced patterns) and of course a clover yarn cutter.

Read More
Read more »

Tuesday, January 25, 2011

Baby Crafts and The Busy Year Two Zero One Zero

12:14 AM  information, interesting, life  No comments

Baby Crafts and The Busy Year Two Zero One Zero

   Yeah a busy busy year Senior Graduations, prom, jobs, collage enrollment and just life period. I feel exhausted after writing that sentence phew! The point of this post is to let readers know that through it all. I'm still ALIVE!!! Plus I'm ready to start blogging again and doing arts and crafts.

Read More
Read more »

Friday, June 5, 2009

Designing Hats

3:24 AM  craft, hat, Homemade, idea, information, interesting, to do  2 comments


This is a Follow Up To: So They Don't Drive You Insane

Hey below is an article on how to design a hat, a straw hat to be exact. Their are other ways to design a hat, but since it's summer I decided to post a straw hat guide.


You can create a custom-made straw hat by using simple techniques and tools that have been adopted from the days of the pioneers. All you need is good quality rye straw, a darning needle, doubled twine string, an upholstery needle, and grosgrain ribbon.

The first step is...

Read More
Read more »

Thursday, June 4, 2009

Designing sandals

7:20 PM  craft, Homemade, idea, information, tutorial, video  No comments

Follow Up To: So They Don't Drive You Insane

This instructional video shows you how to make sandals out of old jeans. The finished product doesn't look to bad either check it out.


Read More

Make Your Own Play Dough

6:52 PM  craft, download, guide, idea, information, to do  2 comments


Kool-Aid Play Dough

Below is a recipe to make your own play dough enjoy.

2 1/2 cups flour
1 cup salt
3 tablespoons vegetable oil
2 cups boiling water
2 packages unsweetened Kool-Aid

Mix dry ingredients. Add oil and water. Wearing gloves, knead for 10 minutes. Store in zip lock bag in refrigerator.

Notes:

  1. Your hands may smell of the Kool-Aid flavor even with gloves.
  2. Kool-Aid is a powdered drink mix sold in North America. Parents just add sugar and water to make the drink. The powder has both flavoring and color which makes it great for this craft.
This more or less a follow up to the clay molding activity. That I mentioned in the last post. After you have made the play dough. You should try completing some of the activities in this book it's very fun.

Create Anything With Clay

Read More

Wednesday, June 3, 2009

So They Don't Drive You Insane

6:32 PM  article, baby, craft, guide, Homemade, idea, information  No comments


The summer break can get very boring for children. They love being out of school, but daytime TV can drive them crazy, not to mention the fact that they got tired of playing with all their new holiday toys about 2 days after the holiday. So how do you keep kids busy during the holiday break? Well you could always give them chores to do....I'm only kidding. One of the best ways to keep kids busy during the holiday break is crafts. Crafts take a lot of time and keep kids interested in what they are doing. Before they know it, it will be time for them to go back to school.

Here are some off the top of my head. That will keep you and the kids busy. Some of them can get a little messy lol.

Description
-------------------------------------------------------------------------------------------------
Clay modeling
+
Acrylic painting| ages 10+|
+ Finger painting

Simple sewing projects (Id say around age 8 with supervision)
+
Designing sandals and hats
+
T-shirt painting for this if you wanna try with younger childen you can. Just dip their hand in some paint and press it on a shirt. Just make sure you clean their hands afterward' s cause you child will to eat it.
+
Make some wind chimes. (very easy to make)
+
Key Charms you know those little things that go key rings.
+
Turn your winter clothes in to summer clothes. A snip here and a snip there with some scissors, and you can add some nice additions to your wardrobe.

There's a whole lot more stuff you can do. Also I'll be explaining how to do some of this stuff in later articles.

Read More

Making Gel Candles for Fun & Profit

4:44 PM  article, craft, guide, idea, information, to do, wax  No comments


Candle making is by no means a dangerous affair and is often an activity that is fun for all the family however people should follow some very basic safety precautions.


Making Gel Candles for Fun & Profit
By: A Graf
____________________________________________________________________
There are a few items you will need to gather before you can start making your gel candles. The most basic are supply containers, gels, pans, wicks, and of course, your kitchen range. Below is a detailed list of the items you will need, and most of these items are available at your local craft and variety stores.

Containers: It's best to use a heat resistant glass, but there are also many types of glass and acrylics.

Materials: Gel Wax, Paraffin when specified in a recipe, candle scent, candle dye, wick, wick clip, and wick base.

Supplies: Craft sticks, knife, spoon, candy thermometer, pliers, small sauce pan, double boiler for paraffin when used, cooking oil spray, non-stick cookie sheet, ice cream scoop, ice pick, Potato peeler for the dye, stove burner, small deep metal pans, and molds.

Wicks & Clips: Use large bleached wicks. Gel candles burn longer than paraffin candles so a large wick is required for the additional burn time. Do not use wire wicks these will leave debris in the gel. Use a metal base clip and crimp it to one end of the wick with pliers or use a small washer.

Dyes & Scents: Candles dyes are great to use because their color is translucent. Crayons can also be used if the proper dyes are not available at your local stores. Candle dyes come in different forms, from wax squares, to liquids and powders. You can mix colors to form additional colors. Scents are fun to add to make the candle fragrant. Scents come in the form of oil based liquids, pellets and wax solids. You add scent before pouring the candle this avoids evaporation.

Additives & Release Agents: If using paraffin, add stearic acid to increase the hardness and raise the melting point. Use spray cooking oil or silicone spray to aid in the release of the molds.

Submerged Objects: In order to submerge objects in your gel candles they must be resistant to burning and melting. Items that work well are buttons, marbles, toys and jewels. Do not use highly flammable items. Some objects will float so you may have to add the items as the gel cools and thickens. This is where the craft sticks or knife comes in handy. You can push items down that float to the top.

Heating Wax: Paraffin should be heated to 130 degrees F to 140 degrees F. The melting point of gel wax is between 160 degrees and 170 degrees F. If you are melting Paraffin you should always use a double boiler. Gel wax can be heated directly on the burner set at a medium to low heat. Tip: Tear gel into small pieces to control the amount of bubbles.

CAUTION: Always be careful when melting wax. It is highly flammable. Make sure your area is well ventilated. Never leave unattended or around young children without supervision.

Clean Up: Use dish soap and hot water to clean utensils, counter tops and tools. Run paraffin under hot water then under soapy water. You can scrape wax off counter tops, or use small amounts of turpentine to aid in removal (be sure to test first).

Once you learn to create your candles create a business plan and decide on what market to target for your product. You could do theme candles such as weddings, birthdays, etc. Possbily decide on making recipe candles, or whatever great ideas you may have.

Then discover where to sell your candles such as craft shows, sell them on ebay, create your own web site, take them to work, set up trade shows, contact local gift shops and talk with others about selling or starting a new business.

Resources for Candle making/Selling: The Ultimate Gel Candle Book

Article Source: EzineArticles.com

Read More

Tuesday, June 2, 2009

Make Your Own Wedding Favors

8:47 PM  article, baking, cooking, idea, information, interesting, weeding  2 comments


I find that sometimes things you make yourself, can be better or even more valuable. To the people you give them to. Than a product you may purchase from a store. The article below shows you how to make one of those things. Have fun making them.


Save Some Money: Make Your Own Wedding Favors
By: Lesley_Anne Graham
____________________________________________________________________
Not only is it a nice touch, but if you have time to make your own simple wedding favors, you can save money that you desperately need for flowers, food, or your honeymoon.


A great wedding favor to make yourself is molded chocolate. With options from lollipops to delicate multicolored shells, dark chocolate to white chocolates you can dye to match your wedding colors, these edible favors are a winner for every age.

To make your own chocolate wedding favors, follow these steps:

Chocolate Wedding Favors

1. Equipment:

Microwave or double boiler to melt chocolates
Plastic bowls and spoons

Candy molds – plastic or coated metal are fine, but nonstick is critical

Small cellophane bags

Small squeeze bottle

Plastic gloves designed for handling food

Candy thermometer

2. Ingredients:
____________________________________________________________________
Molding chocolate like Merckens Chocolate or Wilton Candy Melts. For best results, buy this at a specialty cooking store and ask the store clerk to help you determine how much to purchase.

Lollipop sticks

Luster dust, or pearl dust, to add shimmer to your chocolate

Small paint brush (for the luster dust)

Oil-based flavorings

Decorative ribbons or other decorations to impress in the chocolate

3. Steps:
____________________________________________________________________
Select your molds. Melt the chocolates in a double boiler or microwave (the double boiler is better because of a consistent melt, but you will need to keep an eye on it.) Water goes in the outer pot, the chocolate sits in the inner. Try not to bring the water to a boil, and do not let any water mix with your chocolate. Stir chocolate until it is melted.

In the double boiler method, you can melt about two pounds of chocolate at a time.

When using the microwave method, melt a half-pound at a time. Place in microwave at about 600 watts for 1 minute, then stir. Return to microwave for 15 seconds at a time until completely melted.

If you want to add a flavor, do it now; no more than 20-25 drops per pound should work.

Next, fill a squeeze bottle with chocolate. Squeeze chocolate into each mold crevice carefully to eradicate air bubbles. Tap mold on counter to eliminate remaining air bubbles; pop the stubborn ones with a toothpick. Fill molds to the top, and insert lollipop stick if you wish. Place mold in freezer for about five minutes, or until the chocolate pulls away from the mold. Remove favors from mold and place on a sheet of wax paper to rest; make sure none of them touch the others.


4. Decorating Your Wedding Chocolates:
____________________________________________________________________
Shimmer can be added by coating your chocolates with luster dust. Dip a brush in water or another clear liquid, then in the dust. Brush powder on for a solid-looking shimmer. Put chocolates in cellophane bags and close by tying with a pretty ribbon. These ribbons can be personalized with name and wedding date, and you can even find miniature roses at many home décor stores to slip into the ribbon.

5. Cost:

The more chocolates you make with the same molds, the lower the cost per chocolate goes. In general, you can make about a hundred chocolates for $30. Larger molds and more elaborate decorations can make costs rise to $1 per chocolate.


------------------------------------------

Lesley-Ann Graham runs WeddingTrix.com - a valuable wedding planning resource with articles, tips and advice to help you plan your perfect wedding. The Bride, Groom, Best Man, Bridesmaids and Groomsmen can find it all at.

Read More

Safety First

7:49 PM  article, information, note, safety  No comments


OK people safety is number one. I don't want anybody getting hurt while using craft knives saws or anything else, you may need to craft and/or practice some of the crafts featured in this blog. Here's a article that talks about some of the potential risks you take.

Some artists and craftspeople might assume that all arts materials are safe to work with, based on the simple fact that the materials are readily available. However, some of these materials can pose a hazard if you do not follow all of the safety instructions on the product label.

It is impossible to list all of the potential hazards associated with every arts and crafts material. However, the following examples highlight some things that could be harmful:

* If you draw or paint, you might inhale dust from dry pigments or fumes from the chemical solvents used to clean brushes. Spray paints can produce mists that are harmful when inhaled. Many of these products are also flammable.

* Some photo-processing solutions used in developers, fixers, stop baths and
intensifiers can irritate skin, be poisonous if ingested and may produce dangerous fumes.

* In jewelery-making and enameling, you could inhale dusts or fumes during soldering, pickling, casting or finishing.

* In stained glass work, you could inhale lead fumes when soldering glass pieces together or you could be exposed to lead when handling lead came or leaded solders. You could also inhale hazardous fumes when using acid fluxes during soldering, or do serious damage to your lungs by breathing in powdered glass when using an electric glass grinder.

* In woodworking, you could seriously damage your lungs by inhaling wood dust over and over again. Some of the solvents and adhesives used in stripping, gluing and finishing can also harm your health.

* Some materials that are safe when used on their own can produce hazardous fumes or materials when they are mixed with bleaches, acids, solvents, household cleaners or other substances.

Don't let this article scare you though, just remember Safety first.

Read More

Is There a Close Relationship Between Art and Sport?

3:15 PM  article, information, note  No comments

portrait figures sports La Diaphane

From a very early age we are encouraged to draw and paint. Using self expression to free ourselves through painting and drawing, supplies our developing and inventive minds with one of its main sources of early learning and personal expressive nourishment. I loved art as a youngster and remember, with great fondness, "escaping" the formal structure of school classes during every period of art!

Through participation in sporting activities, I discovered the outlet I needed to express myself and release the artistic side of my personality. As a "Shortstop" or "Outfielder," my position allowed me to play Softball with inventiveness and flair and my young leadership qualities were recognized as I was made team captain.

I used to enjoy and appreciate the individual qualities, widely varying techniques and artistic expression, displayed by all of my friends, in both art and sport. I found that I had an ability to associate most paintings to the artist and realized that, in the main, there was a close relationship between the art work and the artist's personality and character.

To summarize, I feel that there is a close relationship between art and sport and that both activities provide extremely rewarding sources of intuitive and artistic expression.

Read More

Monday, June 1, 2009

Neck Tie Fathers Day Card

10:24 PM  craft, Homemade, idea, information, interesting, to do, tutorial  1 comment

Here's something cool you and your kid can make for daddy this fathers day. Bare with me as I am using my Sloppy Diagrams again in this tutorial.

Materials
  • 1 Piece of 4 x 4 two sided paper (for tie)
  • 1 Piece of 4 1/2 x 3 1/2 if that's to small try 5 1/2 x 4 1/2 for shirt
  • Pair of Scissors


Step #1: Start by folding your 4 x 4 two sided piece of paper into a triangle.


Step #2: Open the triangle back up and use the center fold as a guide so you can fold each corner into the center.

Step 3#: You should now have sort of a cone shaped piece of paper then flip it over to it front side.


Step 4#: Now that you have flipped onto its front side the side with the colors showing. Lets make the front knot of the neck tie. Fold the top down about 3/4 of the way.


Step #5: Then take the point and fold it back up not to the top but about halfway.


Step 6#: Now you see where the tip ended up after the fold you that as a guide and fold the paper up.


Step #7: After that all you have to do is. Flip it over again and repeat step #2 and you should have your necktie.
________________________________________
Next Make A Simple Shirt For Your Neck Tie
________________________________________

No Sloppy Diagrams for this it's just tooo easy.

Step #1: Grab your 5 1/2 x 4 1/2 two sided paper. Fold it an inch of the way down.

Step #2: Now open it up make a cut on each side leaving about 1 1/2 in.

Step #3: Then fold each side into the middle.


The image above is what a finished product should look like with a little more work. Have fun making one of these.

Read More

Rapid Fire Marshmallow Shooter

4:20 PM  craft, guide, Homemade, idea, information, to do, tutorial, video  No comments

What's better than a Marshmallow Shooter? A Rapid Fire Marshmallow Shooter! Check out the video.

Read More

Marshmallow Shooter

3:12 PM  craft, guide, Homemade, idea, information, to do, tutorial  No comments

Ever just get the urge to shoot marshmallow's at things. You may not have but your kid probably has. I present to you the idea a marshmallow shooter. The best thing is I'm gonna tell you exactly how to make one. Followed by a video that's gonna show you how to make a better one. Let's get started shall we.

Materials
  • A 10ft 1/2 inch PVC Pipe
  • A Saw doesn't really matter what kind
  • Measuring Tape
  • Two 90 Degree Elbows(smooth)
  • Two T's
  • Two Caps
  • A Marker(to mark off measurements)
  • Sandpaper

Making The Marshmallow Shooter
_____________________________
Step #1: Make four 3in pieces so take you measuring tape out hook it at the beginning of you 10ft PVC and make a mark at every 3in, 3|6|9|12|.

Step #2: Now it's time for you to cut and sand down the burs around the edge and the inside of your pipes.

Step #3: On to the measuring and cutting two 5in pieces take you measuring tape out hook it at the beginning of you 10ft PVC and make a mark at every 5in, 5|10|. After you've done that, Just repeat step #2.

Step #4: Make one 7in cut and repeat step #2.

Step #5: Layout all you materials you should have four 3in two 5in and last but not least one 7in.

Step #6: Now it's time for the two 90 degree elbows, the two T's and two caps. Your gonna use them to connect all the pieces, like in the sloppy diagram below. It's the best I could lol.

And that's the tutorial hope it helped. Have fun shooting marshmallow's.

Read More

Things To Do When Your Bored And On A Budget

1:29 PM  idea, information, to do  No comments


* Do things like: Give each other a $10 or $15 limit. Then go to a market or some other place where cheap stuff is sold. See who can get the coolest stuff. Then we see who can get the highest price on EBay for it! So you actually MAKE money!

* Organize a "old stuff" party (I think there's a proper name for it) everyone brings a bag of stuff they no longer want (clothes, kitchen stuff, shoes etc). Clear a big space in the lounge room and dump all the stuff in the middle. Get hold of some quiz questions and take turns asking each other questions, when you get a question right, you get to pick from the pile! or... you could ditch the quiz questions and have a free for all grab-fest!

* Browse the web for ideas for whatever your latest interest is

* Make up a treasure map - A piece of cardboard with all pictures and words of all the things you want in life. (It's said they come true)

* Try some scrap booking.

* Write down or make some record of some of the amazing thoughts in your head.
* You might be surprised at just how profound you really are.
* Or at how many good ideas you actually have.

* Play a game such as
* Eye spy
* Or organize a scavenger hunt for your kid/kids

* Glow sticks\rings - Use your imagination, there are plenty of things you can do with these.

* Get creative with some art. Paint, draw, charcoal, craft – anything.

* Magic Eye can be a lot of fun. Look at some 3d pictures

*Put on some music. Have a dance maybe, see how you feel
-------------------------------------------------------------------------------------------------
These are some of the things I do. You gotta have a little imagination for some of them though. Things like the first are good ways for making money, you'd be surprised how much some stuff sales for on EBay.

Read More

Sunday, May 31, 2009

Matching Hooded Sweater For Cute Bunny

10:30 PM  baby, craft, crochet, guide, Homemade, idea, information, interesting, pattern  No comments


As promised here the pattern for the matching cute bunny hooded sweater. I was gonna put some bunny ears on the hood but, I dunno might be to much.

Hooded sweater{Matches The Cute Bunny}

Measurements
__________________
To fit ages |0-3 |3-6 |6-9 |9-12 |12-24 |months

Actual Measurements
__________________
Chest| 48 ||53|| 57|| 62|| 66| cm

Length To Shoulder| 24|| 26|| 28|| 30|| 34| cm

Sleeve Length| 14 ||16 ||18 ||20|| 22| cm

Materials
__________________
4(4:5:5:6) 50g balls of Debbie Bliss cashmerino aran in pale blue
Pair of 5mm knitting needles

Tension
__________________
18 sts and 24 rows to 10cm square over st st using 5mm needles.

Abbreviations
__________________
see the Abbreviations post

Back
__________________
With 5mm needles cast on 46(50:54:58:62) sts.
Beg with a k row work in st st until back measures
24(26:28:30:34) cm from cast on edge, ending with a p row.

Shape shoulders
__________________
Cast off 13(14:15:16:17) sts at beg of next 2 rows.
Cast off rem 20(22:24:26:28) sts.

Front
__________________
Work exactly as given for back until 16 rows less than back to shoulder have been worked
Divide for front opening
Next row (right side) K23(25:27:29:31) sts,
turn and work on these sts only for first side of front, leave
sts on a spare needle
Next row P to end
Next row K21(23:25:27:29), m1, k2
Next row P to end
Next row K21(23:25:27:29), m1, k3.
Next row P to end.
Cont to inc one st as set on 5 foll right side rows, 30(32:34:36:38)
P 1 row.

Shape Shoulder
__________________
Next row (right side) Cast off 13(14:15:16:17) sts,
k a further 7(8:9:10:11) sts, m1, k to end.
Next row P18(19:20:21:22) sts, leave these sts on a holder.
With right side facing, join yarn to rem sts on-spare
needle, k to end.
Next row p to end
Next row k2, m1, k 21(23:25:27:29) sts
Next row p to end
Next row k3, m1, k 21(23:25:27:29) sts
Cont to inc st as set on 6 foll right side rows, 31(33:35:37:39) sts.
Next row (WS) cast off 13(14:15:16:17) sts, P to end.

Hood
__________________
Next row(right side) [K10, m1, k8(9:10:11:12)] across sts of right, cast on 38(40:42:44:46) sts for back then [k8(9:10:11:12) m1, k10] across sts of left front,76(80:84:88:92) sts.
Beg with a p row, work a further 35(37:39:41:43) rows in st st.
Cast off

Sleeves
__________________
With 5mm needles, cast on 30(32:34:36:38) sts.
Beg with a k row, work 8(8:10:10:12) rows in st st.
Inc row K3, m1 k to last 3 sts, m1 k3.
Beg with a p row, work 3 rows in st st.
Rep the last 4 rows until there are 42(46:50:54:58) sts.
Cont straight until sleeve measures 16(18:20:22:24)cm from cast on edge, enough with a p row.
Cast off.

To Finish
__________________
Join shoulder seams. With centre of cast off edge of sleeve to shoulder, sew on sleeves. Join side and sleeve seam. With right sides together fold hood in half and join cast off edges. Join cast on edge of hood to cast off sts of back neck.

Read More

Moon Bottle Cover

4:26 PM  crochet, guide, Homemade, idea, information, interesting, pattern, tutorial  No comments

Another pattern for your viewing pleasure. This time it's a cute bottle cover.


Moon Bottle Cover

Materials
______________
Size of cover 22 x 39cm (8 1/2 x 15 1/2 in)

Rowan RYC Cashsoft DK and Cashsoft Baby DK

A DK Grey (518) 2 x 50g/ 1 3/4 oz

B DK Lime green (509) 1 x 50g/ 1 3/4 oz

C Baby DK Pale green (804) 1 x 50g/ 1 3/4 oz

D DK Organge (510) 1 x 50g/ 1 3/4 oz

Needles
1 pair each of 31/4 mm (US 3) and 4mm (US 6) needles

Buttons
3

Tension
_____________
22 sts and 30 rows = 10cm (4in) square measured over
stocking stitch using 4mm (US 6) needles.

Getting Started

Lower Back
_______________
Using 4mm (US 6) needles and yarn A, cast on 27 sts.
Beg with a K row, work in st st as follows: Work 1 row. Cast on 6 sts at beg of next next 2 rows, 39 sts.
Inc 1 st at each end of next 4 rows, then on foll alt row, ending with WS facing for next row, 49 sts. **
Work 43 rows, ending with RS facing for next row.
Change to 3 1/4mm (US 3) needles.
Next row (RS) K1, *P1, K1, rep from * to end.
Next row P1, *K1, P1, rep from * to end.
These 2 rows form rib.
Work in rib for a further 4 rows, ending with RS facing for next row.
Next row (RS) Rid 9, (cast off 3 sts, rib until there are 11 sts on
right needle after cast off) twice, cast off 3 sts, rib to end.
Next row Rib to end, casting on 3 sts over thos cast off on previous row.
Work in rid for a further 6 rows, ending with RS facing for next row. Cast off in rib.

Front
____________
Work as given for lower back to **.
work 9 rows, ending with RS facing for next row.
Using the intarsia technique, work next 54 rows.
Which is worked entirely in st st beg with row 11 (a K row)
and end at row 64. Break off contrasts and cont using yarn A only.
Work 2 rows.

Shape Top
______________
Dec 1 st at each end of next 4 rows. 41 sts
Cast off 3 sts at beg of next 2 rows, 35 sts.
Dec 1 st at each end of next 3 rows, then on fall alt row, 27 sts.
Work 1 row, ending with RS facing for next row.
Change to 3 1/4mm (US 3) needles.
Beg with a Krow, work in st st as follows: Work 2 rows
Inc 1 st at each end of next 4 rows, ending with RS facing for next row, 35 sts.
Cast on 3 sts at beg of next 2 rows, 41 sts.
Inc 1 st at each end of next 4 rows, 49 sts.
Work 8 rows, ending with RS facing for next row.
Change to 31/4mm (US 3) needles.
Work in rib as given for lower back for 14 rows, ending with RS facing for next row.
Cast off in rib.

Making Up
Press pieces carefully on WS, using a warm iron over a damp cloth.

Embroidery
______________
Using yarn D make a 5cm (2in) long tassel and attach to top of hat section of motif as in photograph. Using the picture above as a guide. Use yarns C and D, embroider stars in sky. For each small star, work three straight stitches and secure at centre with a cross stitch. Using yarn C, work french knots at ends of these straight stitches.

Overlap last 14 rows of front over last 14 rows of back and sew along side edges. Fold in half across centre of narrow robbed section, matching cast-on edges and sew front to back along all edges. Sew on buttons.

Read More

Cute Bunny Rabbit

2:56 PM  baby, craft, crochet, Homemade, idea, information, inspiration, interesting, pattern, tutorial  No comments


Back again presenting another baby craft

Cute Bunny Rabbit
------------------

Measurements
Approximately 28cm, excluding ears

Materials
  • Two 50g balls of Debbie Bliss cashmerino aran in Duck Egg
  • Small amount of cream yarn for pom-pom tail
  • Pair of 3 1/4 knitting needles
  • Washable polyester toy stuffing
  • Grey embroidery wool for features
--------------

Tension

23 sts and 32 rows to 10cm square over st st using
3 1/4mm needles

Abbreviations
______________
m1L= inserting left needle from front, lift stand
between sts and k into back of it so base of made st
slants to the left

m1R= inserting left needle from the back, lift stand
between sts and k into front of it so base of made st
slants to the right

Face
_______________
With 3 1/4mm needles cast on 9 sts.
1st row: (right side) Kfb, k6, kfb, kl.
2nd row: and every wrong side row P.
3rd row: Kfb, k4, m1R, k1, m1L, k3, kfb, k1, 15 sts.
5th row: Kfb, k6, m1R, k1, m1L, k5, kfb, k1, 19 sts.
7th row: Kfb, k8, m1R, k1, m1L, k7, kfb, k1, 23 sts.
9th row: Kfb, k9, m1R, k3, m1L, k8, kfb, k1, 27 sts.
11th row: Kfb, k10, m1R, k5, m1L, k9, kfb, k1, 31 sts.
13th row: K11, k2tog, k5, skpo, k11, 29 sts.
15th row: K10, k2tog, k5, skpo, k10, 27 sts.
17th row: K1, k2tog, k6, k2tog, k5, skpo, k6, skpo, k1, 23 sts.
19th row: K1, k2tog, k4, k2tog, k5, skpo, k2, skpo, k1, 19 sts.
21st row: K1, k2tog, k2, k2tog, k5, skpo, k2, skpo, k1, 15 sts.
21st row: K1, [k2tog] twice, k5, [skpo] twice, k1, 11 sts.
P 1 row.
Cast off.

Back
Gusset
With 3 1/4mm needles, cast on 22 sts. Beg with a k row, work 6 rows in st st. Cont in st st, dec one st at each end of next 8 rows, 6 sts. Cast off.

Back
With right side facing. pick up and k42 sts around shaped edge of gusset. Beg with a p row, work 15 rows in st st.

Dec row(right side)
K1, [k2tog] 10 times, [skpo] 10 times k1, 22 sts. Beg with a p row, work 11 rows in st st

Shape Armholes
Cast off 2 sts at beg of next 2 rows, 18 sts.

Dec row (right side)
K1, k2tog, k to last 3 sts, skpo, k1, 16 sts. Work 5 rows in st st.

Shape Shoulders
Cast off 3 sts at beg of next 2 rows, 10 sts. Work 2 rows in st st.

Shape Back of head

Inc row (right side) Kfb, k to last, 2 sts, kfb, k1, 12 sts, Cont in st st, inc in this way at each end of next 3 right side rows, 18 sts. Work 5 rows in st st. Dec one st at each en of the next row and 4 foll right side rows, 18 sts. cast off.

Front
With 3 1/4mm needles, cast on 22 sts. Beg with a k row, work 16 rows, st st. Dec on st at each end of next row, 20 sts. Work 11 rows in st st.

Shape Armholes
Cast off 2 sts at beg of next 2 rows, 16 sts.

Dec row (right side) K1, k2tog, k to last 3 sts, skpo, k1, 14 sts. Work 5 rows in st st.

Shape Shoulders
Cast off 2 sts at beg of next 2 rows, 10 sts.

Dec row (right side) K1, k2tog, k to last 3 sts, skpo, k1, 8 sts. Work 2 rows in st st. Cast off.

Legs
With 3 1/4mm needles, cast on 5 sts. 1st row (right side) [ktb] 4 times, k1 9 sts.
P 1 row. Inc one st at each end of next row and roll 2 right side rows, 15 sts. Work 17 rows in st st.

Shape Thighs
1st row (right side) K6, [kfb] twice, k7, 17 sts. Working one more st before and sfter incs, inc 2 sts in this way at centre of next 5 right side rows, 27 sts. Work 9 rows in st st **.

Next row (right side) K11, skpo, k1, k2rog, k11, 25 sts, P 1 row.
Next row (right side0 K10, skpo, k1, k2rog, k10, 23 sts, P 1 row. Cast off.

Arms
Work as given for Legs to **. Shape top Cast off 2 sts at beg of next 2 rows. 11 sts. Dec one st at each end of next row. 9 sts.
P 1 row.
Cast off.

Ears
With 3 1/4mm needles, cast on 7 sts

1st row (right side) kfb, k to last 2 sts, kfb, k1, 9sts.
2nd row K1, p to last st, k1. Cont in st st with k1 edge sts, inc one st at each end of next 3 right side rows. 15 sts. Work 31 rows straight.

Dec row (right side) K2, skpo, k to last 4 sts, k2tog,
k2. 13 sts.
Dec in this way at each end of next 2 right side rows,
9 sts. Work 1 row. Cast off.

To Finish
______________
Join inside leg seams. Stuff legs. Flatten tops of legs and slip stitch closed. Join back to front at side seams. Sew legs to cast on edge of front, then to cast on edge of back join arm seams. stuff arms. stuff body to armholes. join arm seams. stuff arms. Stuff body to armholes. join shoulder and set in arms. Add more stuffing to body through neck hole. Fold cast on edge of face in half and join for chin seam. Join face to back of the head, leaving a gap at the top. Stuff face. Roll cast off edges of ears and set ears into gap at top of head, closing seam between ears. Add more stuffing to head, Join face to neck. Using Grey embroidery thread and face shaping as a guide to placing features, embroider nose, mouth and eyes, pulling thread through head to indent eyes slightly. Make a pom-pom from cream yarn and sew on for tail.

Well finally finished with this one, its a really nice finished product. If it's to plain you can always just rework the pattern to suit your own sense of style. Oh yeah I have a nice matching hooded sweater pattern for this that I will be posting soon. So look out for that in the mean time have fun making this

Read More
Older Posts Home

Connects

Blog Directory


Feedage Grade b rated


  • Popular
  • Tags
  • Blog Archives
  • Spread Happiness With Eeyore Re-DUX
    Well I'd like to start off  by telling all of Eeyores adoring fans sorry for the wait. He is now back and here to stay. He has even brou...
  • Spread Happiness With Eeyore
      CHECK OUT THE RE-DUX EEYORE IS BACK AND HERE TO STAY Very busy day yesterday sorry I didn't get to post a pattern that. I prom...
  • Spread Happiness With Pooh Bear
    So here I am again with a late post. But I come bearing a gift so all is not lost. Check it out I got a cool craft of one of my favorite ch...
  • How To Easter Craft | Paper Easter Basket
    How-To: Weave a Paper Easter Basket   This craft was not produced by me but the lovely Diane Gilleland. she wrote the book on the suff ...
  • Eeyore and Friends Update
    Hi everyone I have some tremendous news! I have found the Eeyore crochet pattern, not only have I found the Eeyore but his friends Tigger, P...
Powered By Blogger

Pintrest Follow ME

Follow Me on Pinterest
© Baby Crafts. Powered by Blogger.

My Fav's

  • A Little of This and a Little of That

Labels

  • article
  • baby
  • baking
  • best sausage breakfast casserole
  • card
  • clothing
  • cooking
  • craft
  • crochet
  • decoupage
  • doll
  • download
  • easy sausage breakfast casserole
  • Embroidered
  • feng shui
  • Floam
  • guide
  • hat
  • Homemade
  • how to make stickers at home
  • idea
  • information
  • inspiration
  • interesting
  • jimmy dean sausage breakfast casserole
  • life
  • magazine
  • make vinyl stickers at home
  • make your own vinyl stickers
  • make your own vinyl stickers at home
  • note
  • origami
  • paper to make stickers
  • pattern
  • pdf
  • printer paper to make stickers
  • recycle
  • safety
  • sausage breakfast casserole recipes
  • sausage breakfast casserole with crescent rolls
  • sewing
  • stitching
  • to do
  • tutorial
  • Valentine
  • video
  • wax
  • weeding
  • zen garden

Blog Archive

  • ▼  2016 (3)
    • ▼  May (2)
      • Grandmas Gold Egg And Sausage Breakfast Casserole
      • Wedding Season - Print Our Own Marriage Invitation...
    • ►  March (1)
  • ►  2015 (3)
    • ►  July (2)
    • ►  May (1)
  • ►  2012 (5)
    • ►  June (3)
    • ►  May (2)
  • ►  2011 (9)
    • ►  October (1)
    • ►  April (1)
    • ►  February (2)
    • ►  January (5)
  • ►  2010 (1)
    • ►  August (1)
  • ►  2009 (31)
    • ►  June (13)
    • ►  May (18)

Recent Posts

Follow @bgardner

Follow this blog

 
  • Blogger Tutorials | Tools , Tips , SEO, Facebook tricks

    Loading...
  • Blogger Templates Gallery

    Loading...
  • Pages

    • Home
    • YouTube Crafting Videos
    • About Me
    • Contact Me
Copyright © Baby Crafts | Powered by Blogger
Design by FThemes | Blogger Theme by Lasantha - PremiumBloggerTemplates.com | NewBloggerThemes.com Distributed By Gooyaabi Templates